Learning Webpack: The Exercises That Changed How I Build for the Web
There’s a moment in every front-end developer’s life when the toolchain becomes the bottleneck. You’re comfortable writing JavaScript, CSS, HTML — the actual code feels natural. But then you need to use SASS. And import images. And split your code into multiple bundles. And transpile modern JavaScript for older browsers. And suddenly you realize: you don’t have a build system. You have a problem.
For me, that moment led to Webpack.
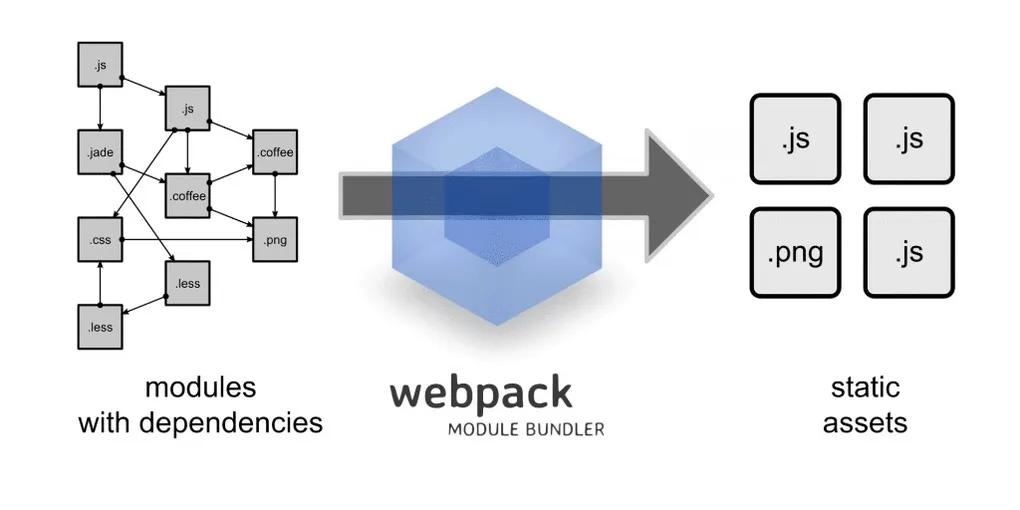
Webpack isn’t just a tool — it’s the tool. The module bundler that has taken the JavaScript ecosystem by storm. Everyone uses it. Every framework recommends it. Every tutorial assumes you have it configured. But configuring it? That’s its own skill. And like any skill worth having, I decided to learn it properly — not by copying configs from Stack Overflow, but by building a series of exercises from scratch, each one targeting a specific feature.
The result was a collection of webpack examples that became my reference manual for every subsequent project.
Why Webpack feels like a revolution
Before Webpack, front-end builds were a mess. You had Grunt task runners, Gulp pipelines, RequireJS for modules, separate tools for each file type. Nothing talked to each other. Configuration was scattered across multiple files and systems.
Webpack changes the mental model completely: everything is a module. JavaScript files? Modules. CSS files? Modules. Images? Modules. Fonts? Modules. Every asset in your project flows through the same dependency graph, gets processed by the right loader, and comes out the other side as an optimized bundle. One tool. One config. One mental model.
The concept is elegant. The execution — with its webpack.config.js that can grow into a hundred-line monster — is where things get interesting.
Starting simple: loaders for everything
My learning path followed a natural progression. Start with the basics, understand each piece in isolation, then combine them into real projects.
Babel Loader — speaking modern JavaScript everywhere
The first exercise was babel-loader — the gateway to modern JavaScript. You write ES6+ code (arrow functions, destructuring, async/await), and Babel transpiles it to ES5 that every browser understands. The config is minimal:
module: {
  rules: [
    {
      test: /\.js$/,
      exclude: /node_modules/,
      use: {
        loader: 'babel-loader',
        options: {
          presets: ['@babel/preset-env']
        }
      }
    }
  ]
}
Simple. But understanding why this works — the regex matching, the exclusion of node_modules, the preset system — that’s the foundation for everything else.
CSS, SASS, LESS, Stylus, PostCSS — the style gauntlet
This is where I went deep. Not one CSS exercise, but five:
- css-style-loader — inject CSS directly into the DOM via
<style>tags - sass-loader — compile
.scssfiles (the preprocessor I’d use most in real projects) - less-loader — compile LESS files (popular in some ecosystems)
- stylus-loader — compile Stylus (terser syntax, fewer characters)
- postcss-loader — the PostCSS pipeline for autoprefixing, future CSS features, optimizations
Why all five? Because every project uses a different one, and I wanted to understand the pattern, not just memorize a config. The pattern is always the same: test a file extension, use a chain of loaders that process from right to left. Once you see it for one preprocessor, you see it for all of them.
Assets: images, fonts, videos
Then came the asset loaders:
- url-loader-images — small images get inlined as base64 data URIs (faster loading, fewer HTTP requests), large images get emitted as files
- url-loader-fonts — same pattern for font files, with proper MIME types
- file-loader-video — video files always emitted as separate files (too large to inline)
- json-loader — import JSON files directly as JavaScript objects
Each exercise teaches a specific trade-off. Inlining a 2 KB icon as base64 saves an HTTP request. Inlining a 200 KB image bloats your bundle. The limit parameter in url-loader is where you draw that line.
Code organization: the art of splitting
Once you understand loaders, the next frontier is how you organize your output. This is where Webpack goes from “build tool” to “architecture tool.”
Multiple entry points
Not every page needs the same JavaScript. A login page doesn’t need the charting library your dashboard uses. The multiple-entry-points exercise teaches me to define separate bundles:
entry: {
  home: './src/home.js',
  admin: './src/admin.js',
  contact: './src/contact.js'
}
Three entry points, three bundles, each containing only the code it needs.
Dynamic imports and code splitting
Even better than manual entry points: dynamic imports. Load code only when the user actually needs it:
button.addEventListener('click', () => {
  import('./heavy-module.js').then(module => {
    module.doExpensiveThing();
  });
});
Webpack sees that import() call and automatically creates a separate chunk. The heavy module only downloads when the user clicks the button. This is mind-blowing for me — the bundler understanding your code’s execution patterns and optimizing around them.
Preventing duplication
When you have multiple entry points that share dependencies, Webpack can deduplicate them — extracting the common code into a shared chunk that gets loaded once and cached. The prevent-duplication exercise teaches me the SplitChunksPlugin configuration that makes this automatic.
Vendor bundles and DLL plugin
Two exercises that change how I think about caching:
Vendor bundles — separate your application code (changes frequently) from third-party libraries (change rarely). The browser caches vendor.bundle.js independently, so updating your app doesn’t invalidate the cache for React, lodash, or moment.js.
DLL plugin — pre-compile vendor libraries into a “Dynamic Link Library” that Webpack doesn’t need to reprocess on every build. For large projects, this cuts build times dramatically. You run the DLL build once, and subsequent builds skip all that vendor processing.
Plugin extract text: CSS in its own file
The plugin-extract-text exercise solves a problem I hit immediately in production: the css-style-loader injects CSS via JavaScript, which means there’s a flash of unstyled content on first load. The ExtractTextPlugin (later MiniCssExtractPlugin) pulls CSS out into its own .css file that the browser loads in parallel with JavaScript. Proper production setup.
External dependencies
The external exercise teaches a subtle but important concept: sometimes you don’t want Webpack to bundle a library. If you’re loading React from a CDN via a <script> tag, you tell Webpack to treat it as an external — available globally, but not bundled. This keeps your bundle small while still letting you import React from 'react' in your code.
React integration
The react exercise brings everything together: Babel for JSX transpilation, style loaders for CSS, url-loader for images, webpack-dev-server for hot reloading. A complete React development environment built from scratch, every piece understood because I’ve studied each one individually in the previous exercises.
This is the payoff. No create-react-app magic. No hidden configuration. Every line in webpack.config.js is something I can explain because I’ve written it myself in isolation first.
Webpack Dev Server: the development loop
The webpack-dev-server exercise completes the picture. A local server that watches your files, rebuilds on changes, and refreshes the browser automatically. With Hot Module Replacement, it can even update modules in place without a full page reload — you change a CSS value and see it update instantly, without losing your application state.
After weeks of manually running builds and refreshing browsers, dev server feels like cheating.
The backend chapter: Webpack beyond the browser
There’s an assumption that sticks to Webpack like glue: it’s a front-end tool. Every tutorial focuses on browsers. Every example bundles code meant for <script> tags. But after all those exercises focused on the front-end, I asked myself — if Webpack treats everything as a module, why should it care whether that module runs in a browser or on a server?
The answer is: it doesn’t. So I built a separate project for backend Webpack to prove it.
Why bundle backend code at all?
At first, the idea sounds counterintuitive. Node.js already has a module system — require() works natively. You don’t need to bundle anything for it to run. But there are real advantages:
- Consistent tooling — same build pipeline, same config patterns, same mental model across your entire stack. Front-end and back-end speak the same language.
- Babel transpilation — use modern JavaScript features (or even Flow type annotations) in your server code, regardless of which Node.js version you’re targeting.
- Optimized output — tree shaking, minification, and dead code elimination apply to server code too. A smaller bundle means faster cold starts in serverless environments.
- Source maps — proper debugging with original source locations, even in production.
The config that changes everything
The webpack.config.js for a backend project looks surprisingly similar to a front-end one, but with a few critical differences:
module.exports = (env, argv) => ({
  entry: {
    vendor: ['express'],
    index: path.resolve(__dirname, 'src/index.js')
  },
  output: {
    path: path.resolve(__dirname, 'dist/'),
    filename: '[name].js',
    library: 'main',
    libraryTarget: 'commonjs2'  // Node.js module format
  },
  target: 'node',  // This is the key line
  node: {
    __filename: true,
    __dirname: true
  },
  // ...loaders, plugins, optimization
});
Three lines tell the whole story:
target: 'node'— tells Webpack not to polyfill or mock Node.js built-ins likefs,path, orhttp. In front-end mode, Webpack replaces these with browser-compatible shims. In node mode, it leaves them alone.libraryTarget: 'commonjs2'— the output usesmodule.exportsinstead of a browser-oriented format. The bundle is a proper Node.js module that you canrequire()from anywhere.node: { __filename: true, __dirname: true }— preserves the real file paths instead of replacing them with Webpack’s internal references. Critical for server code that reads files from disk.
Express, Babel, and Docker — the full picture
The project bundles an Express server with Babel transpilation — meaning I could write server code using the latest JavaScript features and target Node 8.10 specifically:
presets: [
  ['env', {
    target: { node: 8.10 },
    useBuiltIns: false
  }]
]
And then there’s the Docker integration. The project includes a docker-compose.yaml setup with commands mirrored for both local and containerized development:
# Local development
yarn build:dev           # Development bundle
yarn build:dev:watch     # Watch mode
yarn build:prod          # Optimized production build

# Docker development (identical workflow)
yarn docker:build:dev
yarn docker:build:dev:watch
yarn docker:build:prod
This is where the consistency becomes tangible. Whether you’re building the front-end, the back-end, running locally, or inside a Docker container — the workflow is webpack --mode development or webpack --mode production. Same tool, same flags, same mental model.
A source map trick worth stealing
One detail in the config that I kept reusing in later projects: the BannerPlugin trick for source maps in Node.js:
new webpack.BannerPlugin({
  banner: 'require("source-map-support").install();',
  raw: true,
  entryOnly: false
})
This injects source-map-support at the top of every output file. When your bundled server throws an error, the stack trace points to your original source files, not the bundled output. In production debugging, this is the difference between “error at line 1847 of index.js” and “error at line 23 of userController.js.”
What it proved
The backend experiment proved something beyond the technical: understanding a tool deeply lets you apply it in unexpected ways. The front-end exercises gave me fluency in Webpack’s concepts — loaders, plugins, targets, entry points. With that vocabulary, pointing Webpack at a Node.js application wasn’t a leap. It was a natural next step.
What these exercises taught me
Looking at the webpack_examples repository, each folder is a lesson learned. But the meta-lesson is bigger than any individual exercise:
Learn the pieces before learning the whole. I could have started with a complex boilerplate and worked backwards. Instead, I started with one loader, one concept, one config — and built up. By the time I’m configuring React projects with code splitting, DLL optimization, and extracted CSS, nothing feels magical. Everything is just a combination of pieces I already understand.
That approach — isolating concepts, building examples in isolation, then combining — became my go-to learning strategy for any new tool. It’s slower at the beginning, but it pays compound interest. You don’t just learn to use the tool; you learn to think in it.
These exercises became my reference library. Every new project I configure goes back to one of these folders, grabs the relevant config, and adapts it. Not copy-pasting from Stack Overflow — reaching into my own understanding.
The mental model Webpack taught me — everything is a module, everything flows through a graph, every transformation is a loader, every optimization is a plugin — applies everywhere. Rollup and other tools build on the same core ideas that Webpack crystallized.
And it all starts with a folder, a concept, and a webpack.config.js.